This rich, moist chocolate cake is incredibly decadent, with a dense yet fluffy texture and deep chocolate flavor. Perfect for any chocolate lover!
Ingredients:
- 1 3/4 cups all-purpose flour
- 1 1/2 teaspoons baking powder
- 1/2 teaspoon baking soda
- 1/2 teaspoon salt
- 3/4 cup unsweetened cocoa powder
- 2 cups granulated sugar
- 3/4 cup unsalted butter, softened
- 2 large eggs
- 1 teaspoon vanilla extract
- 1 cup buttermilk (or whole milk)
- 1/2 cup boiling water
- 1 cup semisweet chocolate chips (optional for extra chocolatey texture)
For the Chocolate Fudge Frosting:
- 1/2 cup unsalted butter, softened
- 1/2 cup heavy cream
- 3/4 cup unsweetened cocoa powder
- 3 cups powdered sugar
- 1 teaspoon vanilla extract
- Pinch of salt
Instructions:
- Preheat the Oven: Preheat your oven to 350°F (175°C). Grease and flour two 9-inch round cake pans.
- Mix Dry Ingredients: In a medium bowl, whisk together the flour, baking powder, baking soda, salt, and cocoa powder. Set aside.
- Cream the Butter and Sugar: In a large bowl, beat together the butter and granulated sugar until light and fluffy, about 3-4 minutes.
- Add Eggs and Vanilla: Add the eggs, one at a time, beating well after each addition. Stir in the vanilla extract.
- Alternate Adding Dry Ingredients and Buttermilk: Gradually add the dry ingredients in three parts, alternating with the buttermilk in two parts. Start and end with the dry ingredients. Mix until just combined.
- Add Boiling Water: Stir in the boiling water (the batter will be thin, but that’s okay—it makes the cake extra moist). Fold in the chocolate chips, if using.
- Bake the Cake: Pour the batter evenly into the prepared pans. Bake for 30-35 minutes, or until a toothpick inserted into the center comes out clean.
- Cool the Cake: Allow the cakes to cool in the pans for 10 minutes before transferring them to a wire rack to cool completely.
- Make the Chocolate Fudge Frosting: In a medium saucepan, heat the butter and heavy cream over medium heat until melted and combined. Whisk in the cocoa powder, and bring the mixture to a simmer.
- Add Sugar and Vanilla: Remove from heat, and whisk in the powdered sugar, vanilla extract, and pinch of salt. Beat until smooth and glossy.
- Frost and Serve: Once the cake is completely cool, frost the top of one cake, then place the second cake on top. Frost the top and sides with the chocolate fudge frosting. Slice and enjoy!
Make-Ahead & Storage Instructions:
Store leftover cake in an airtight container at room temperature for up to 3 days, or in the refrigerator for up to 5 days. You can also freeze the cake (without frosting) for up to 3 months—just wrap it tightly in plastic wrap and foil.
Customization Ideas:
- Peanut Butter Version: Add a layer of peanut butter frosting between the cake layers, or drizzle peanut butter on top of the frosting.
- Mocha Version: Add 1 tablespoon of instant coffee granules to the dry ingredients for a mocha twist.
- Mint Version: Add 1 teaspoon of mint extract to the frosting and a sprinkle of crushed mint candies on top.
This chocolate fudge cake is perfect for any chocolate craving and will leave your guests wanting more! 🍫🎂
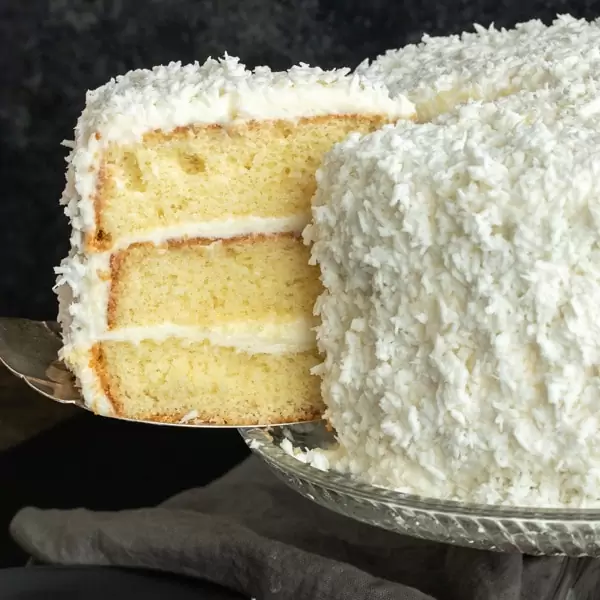
This light and fluffy coconut cake is rich with coconut flavor and topped with a creamy coconut frosting. Perfect for tropical-themed parties or anyone who loves coconut!
Ingredients:
- 2 1/2 cups all-purpose flour
- 1 1/2 teaspoons baking powder
- 1/2 teaspoon baking soda
- 1/2 teaspoon salt
- 1 cup unsalted butter, softened
- 1 1/2 cups granulated sugar
- 4 large eggs
- 1 teaspoon vanilla extract
- 1 teaspoon coconut extract (optional)
- 1 cup buttermilk (or whole milk)
- 1 1/2 cups shredded sweetened coconut
- 1/2 cup coconut milk (optional, for extra coconut flavor)
For the Coconut Frosting:
- 1 cup unsalted butter, softened
- 4 cups powdered sugar
- 1 teaspoon vanilla extract
- 1/2 cup coconut milk
- 1 1/2 cups shredded coconut (for topping)
Instructions:
- Preheat the Oven: Preheat your oven to 350°F (175°C). Grease and flour two 9-inch round cake pans.
- Mix Dry Ingredients: In a medium bowl, whisk together the flour, baking powder, baking soda, and salt. Set aside.
- Cream the Butter and Sugar: In a large bowl, beat together the softened butter and granulated sugar until light and fluffy, about 3-4 minutes.
- Add the Eggs and Flavorings: Add the eggs, one at a time, beating well after each addition. Stir in the vanilla extract and coconut extract (if using).
- Alternate Adding Dry Ingredients and Buttermilk: Gradually add the dry ingredients in three parts, alternating with the buttermilk in two parts. Start and end with the dry ingredients. Mix until just combined.
- Fold in Coconut: Gently fold in the shredded coconut and coconut milk (if using).
- Bake the Cake: Pour the batter evenly into the prepared pans. Bake for 25-30 minutes, or until a toothpick inserted into the center comes out clean.
- Cool the Cake: Allow the cakes to cool in the pans for 10 minutes before transferring them to a wire rack to cool completely.
- Make the Coconut Frosting: In a large bowl, beat together the butter and powdered sugar until smooth and creamy. Add the vanilla extract and coconut milk, and mix until fluffy.
- Frost and Serve: Once the cake has cooled, frost the top of one cake, then place the second cake on top. Frost the top and sides of the cake with the coconut frosting. Sprinkle the shredded coconut over the top for decoration.
Make-Ahead & Storage Instructions:
Store leftover cake in an airtight container in the refrigerator for up to 5 days. You can also freeze the cake (without frosting) for up to 3 months—just wrap it tightly in plastic wrap and foil.
Customization Ideas:
- Pineapple Coconut Cake: Add 1/2 cup of crushed pineapple (drained) to the batter for a tropical twist.
- Lemon Coconut Cake: Add 1 tablespoon of lemon zest and 1 tablespoon of lemon juice to the batter for a citrusy flavor boost.
- Chocolate Coconut Cake: Mix in 1/2 cup of chocolate chips into the batter or drizzle melted chocolate over the cake.
This coconut cake is perfect for any celebration and will bring a tropical flair to your dessert table! 🥥🍰
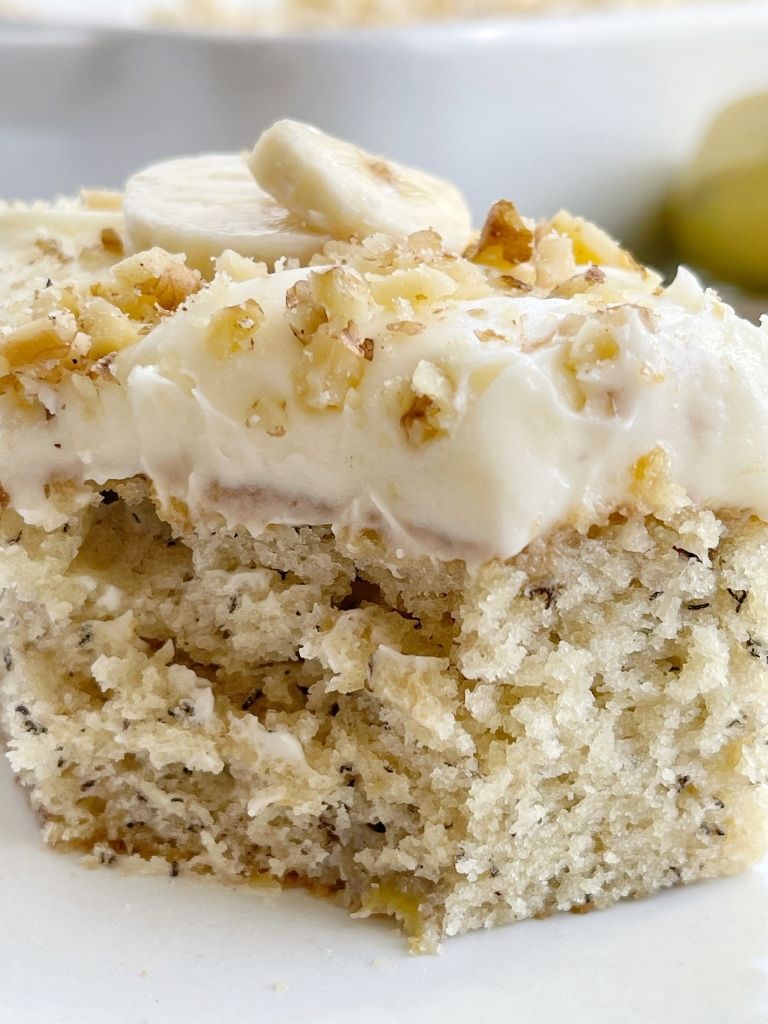
This banana bread cake is moist, flavorful, and has all the comforting qualities of classic banana bread but with a lighter, cakier texture. It's perfect for using up ripe bananas and is a crowd-pleaser!
Ingredients:
- 2 1/2 cups all-purpose flour
- 1 teaspoon baking soda
- 1/2 teaspoon salt
- 1/2 teaspoon ground cinnamon
- 1/4 teaspoon ground nutmeg
- 1/2 cup unsalted butter, softened
- 1 cup brown sugar, packed
- 2 large eggs
- 4 ripe bananas, mashed
- 1 teaspoon vanilla extract
- 1/2 cup buttermilk (or whole milk)
- 1/2 cup chopped walnuts or pecans (optional)
For the Cream Cheese Frosting:
- 8 oz cream cheese, softened
- 1/4 cup unsalted butter, softened
- 2 cups powdered sugar
- 1 teaspoon vanilla extract
Instructions:
- Preheat the Oven: Preheat your oven to 350°F (175°C). Grease and flour a 9-inch round or square cake pan.
- Mix Dry Ingredients: In a medium bowl, whisk together the flour, baking soda, salt, cinnamon, and nutmeg. Set aside.
- Cream the Butter and Sugar: In a large bowl, beat together the butter and brown sugar until light and fluffy (about 3-4 minutes).
- Add the Eggs and Bananas: Add the eggs, one at a time, beating well after each addition. Stir in the mashed bananas and vanilla extract.
- Alternate Adding Dry Ingredients and Buttermilk: Gradually add the dry ingredients in three parts, alternating with the buttermilk in two parts. Start and end with the dry ingredients. Mix until just combined.
- Fold in Nuts (Optional): If using, gently fold the chopped walnuts or pecans into the batter.
- Bake the Cake: Pour the batter into the prepared cake pan. Bake for 30-35 minutes or until a toothpick inserted into the center comes out clean.
- Cool the Cake: Allow the cake to cool in the pan for 10 minutes before transferring it to a wire rack to cool completely.
- Make the Cream Cheese Frosting: In a medium bowl, beat the cream cheese and butter together until smooth. Gradually add the powdered sugar, one cup at a time, and beat until fluffy. Stir in the vanilla extract.
- Frost and Serve: Once the cake has cooled, frost it with the cream cheese frosting. Slice and enjoy!
Make-Ahead & Storage Instructions:
Store leftover cake in an airtight container in the refrigerator for up to 5 days. You can also freeze the cake (without frosting) for up to 3 months—just wrap it tightly in plastic wrap and foil.
Customization Ideas:
- Chocolate Chip Version: Add 1/2 cup of chocolate chips to the batter for a chocolatey twist.
- Healthier Version: Substitute half of the butter with applesauce or Greek yogurt for a lighter option.
- Caramel Version: Drizzle with caramel sauce or top with caramelized banana slices for an extra treat.
This banana bread cake is soft, sweet, and irresistible—a perfect dessert or snack! 🍌🍰
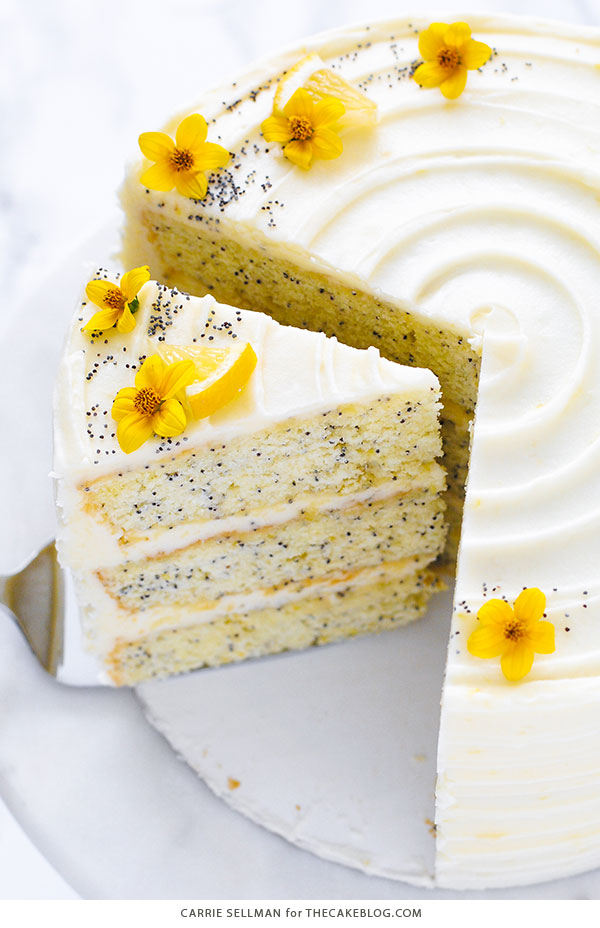
This light and refreshing lemon poppy seed cake is bursting with zesty lemon flavor and a hint of crunch from the poppy seeds. It’s a perfect spring or summer dessert!
Ingredients:
- 2 1/2 cups all-purpose flour
- 1 1/2 teaspoons baking powder
- 1/2 teaspoon baking soda
- 1/4 teaspoon salt
- 1 tablespoon poppy seeds
- 1 cup unsalted butter, softened
- 1 1/2 cups granulated sugar
- 4 large eggs
- Zest of 2 lemons
- 1/4 cup fresh lemon juice
- 1 teaspoon vanilla extract
- 1 cup buttermilk (or whole milk)
For the Glaze:
- 1 cup powdered sugar
- 2 tablespoons fresh lemon juice
- 1/2 teaspoon lemon zest
Instructions:
- Preheat the Oven: Preheat your oven to 350°F (175°C). Grease and flour a 9-inch round or bundt cake pan.
- Mix Dry Ingredients: In a medium bowl, whisk together the flour, baking powder, baking soda, salt, and poppy seeds. Set aside.
- Cream the Butter and Sugar: In a large bowl, beat the butter and sugar together until light and fluffy, about 3-4 minutes.
- Add the Eggs and Flavorings: Add the eggs, one at a time, beating well after each addition. Stir in the lemon zest, lemon juice, and vanilla extract.
- Alternate Adding Dry Ingredients and Buttermilk: Gradually add the dry ingredients in three parts, alternating with the buttermilk in two parts. Start and end with the dry ingredients. Mix until just combined.
- Bake the Cake: Pour the batter into the prepared cake pan. Bake for 30-35 minutes (for round pan) or 45-50 minutes (for bundt pan) or until a toothpick inserted into the center comes out clean.
- Cool the Cake: Let the cake cool in the pan for 10 minutes, then transfer to a wire rack to cool completely.
- Make the Glaze: In a small bowl, whisk together the powdered sugar, lemon juice, and lemon zest until smooth.
- Glaze and Serve: Once the cake has cooled, drizzle the glaze over the top. Let it set before slicing and serving.
Make-Ahead & Storage Instructions:
Store leftover cake in an airtight container at room temperature for up to 3 days. It can also be refrigerated for up to 5 days. You can freeze the cake (without the glaze) for up to 3 months—just wrap it tightly in plastic wrap and foil.
Customization Ideas:
- Lemon Frosting: For an extra lemony touch, frost the cake with lemon buttercream or cream cheese frosting.
- Berry Version: Add fresh berries like raspberries or blueberries on top or in the batter for a fruity twist.
- Healthier Version: Substitute half the butter with Greek yogurt for a lighter cake.
This lemon poppy seed cake is tangy, sweet, and perfectly moist—ideal for any occasion! 🍋🌸
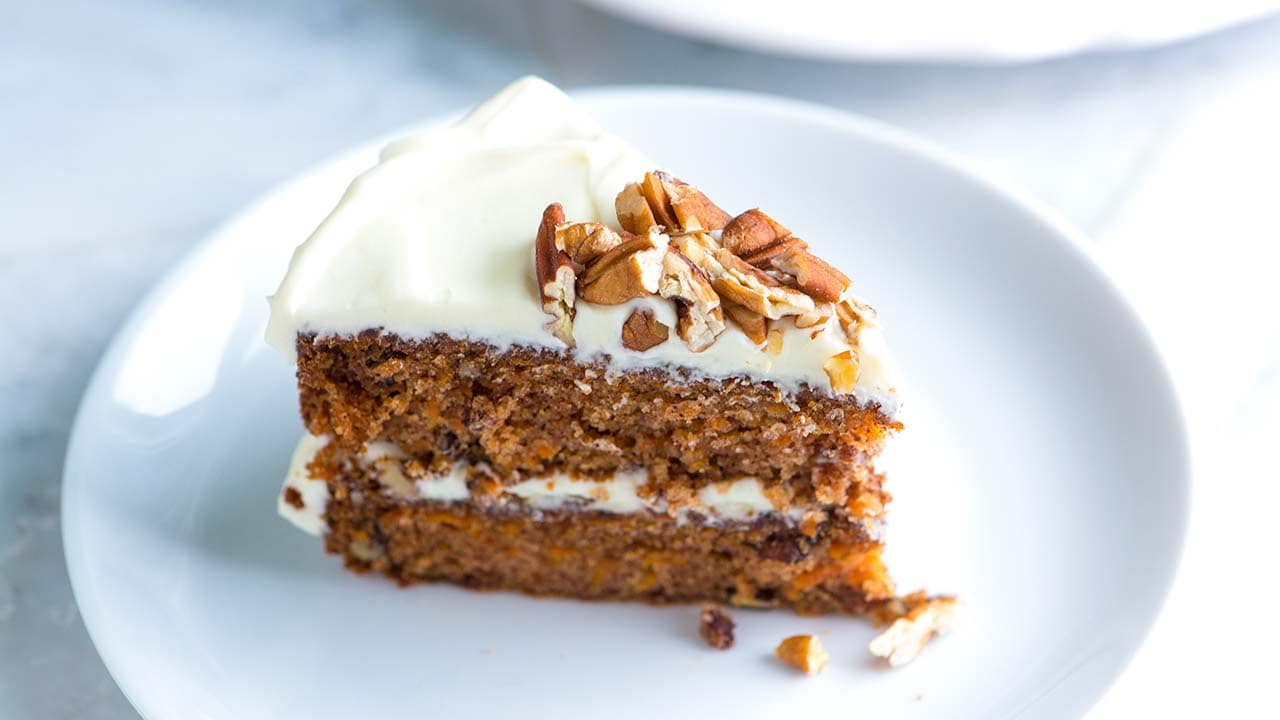
This moist and flavorful carrot cake is packed with spices, tender carrots, and walnuts. Topped with a rich cream cheese frosting, it's the perfect dessert for any occasion!
Ingredients:
- 2 cups all-purpose flour
- 2 teaspoons baking powder
- 1 teaspoon baking soda
- 1 1/2 teaspoons ground cinnamon
- 1/2 teaspoon ground nutmeg
- 1/2 teaspoon salt
- 1 1/2 cups granulated sugar
- 1/2 cup brown sugar, packed
- 4 large eggs
- 1 1/2 cups vegetable oil
- 2 teaspoons vanilla extract
- 2 cups grated carrots (about 4 medium carrots)
- 1/2 cup chopped walnuts or pecans (optional)
- 1/2 cup raisins (optional)
For the Cream Cheese Frosting:
- 8 oz cream cheese, softened
- 1/2 cup unsalted butter, softened
- 4 cups powdered sugar
- 1 teaspoon vanilla extract
Instructions:
- Preheat the Oven: Preheat your oven to 350°F (175°C). Grease and flour two 9-inch round cake pans.
- Mix Dry Ingredients: In a medium bowl, whisk together the flour, baking powder, baking soda, cinnamon, nutmeg, and salt. Set aside.
- Mix Wet Ingredients: In a large bowl, beat together the granulated sugar, brown sugar, and eggs until smooth. Add the oil and vanilla extract, and mix until combined.
- Add the Carrots and Nuts: Stir in the grated carrots, walnuts (if using), and raisins (if using).
- Combine Wet and Dry Ingredients: Gradually add the dry ingredients to the wet ingredients and mix until just combined.
- Bake the Cake: Divide the batter evenly between the prepared pans. Bake for 30-35 minutes, or until a toothpick inserted into the center comes out clean.
- Cool the Cake: Allow the cakes to cool in the pans for 10 minutes before transferring them to a wire rack to cool completely.
- Make the Cream Cheese Frosting: In a medium bowl, beat the cream cheese and butter together until smooth and creamy. Gradually add the powdered sugar, 1 cup at a time, and beat until fluffy. Stir in the vanilla extract.
- Frost and Serve: Once the cakes are completely cool, frost the top of one cake, place the second cake on top, and frost the top and sides of the entire cake. Decorate with additional walnuts, raisins, or shredded coconut if desired.
Make-Ahead & Storage Instructions:
Store leftover cake in an airtight container in the refrigerator for up to 4 days. You can also freeze the cake for up to 3 months—just wrap it tightly in plastic wrap and foil.
Customization Ideas:
- Pineapple Version: Add 1/2 cup of crushed pineapple (drained) for extra moisture and flavor.
- Vegan Version: Replace eggs with flax eggs and use non-dairy milk and oil to make it vegan.
- Spiced Version: Add 1/2 teaspoon ground ginger for an extra warm, spiced flavor.
This carrot cake is perfect for any celebration and will become a crowd favorite! 🥕🍰
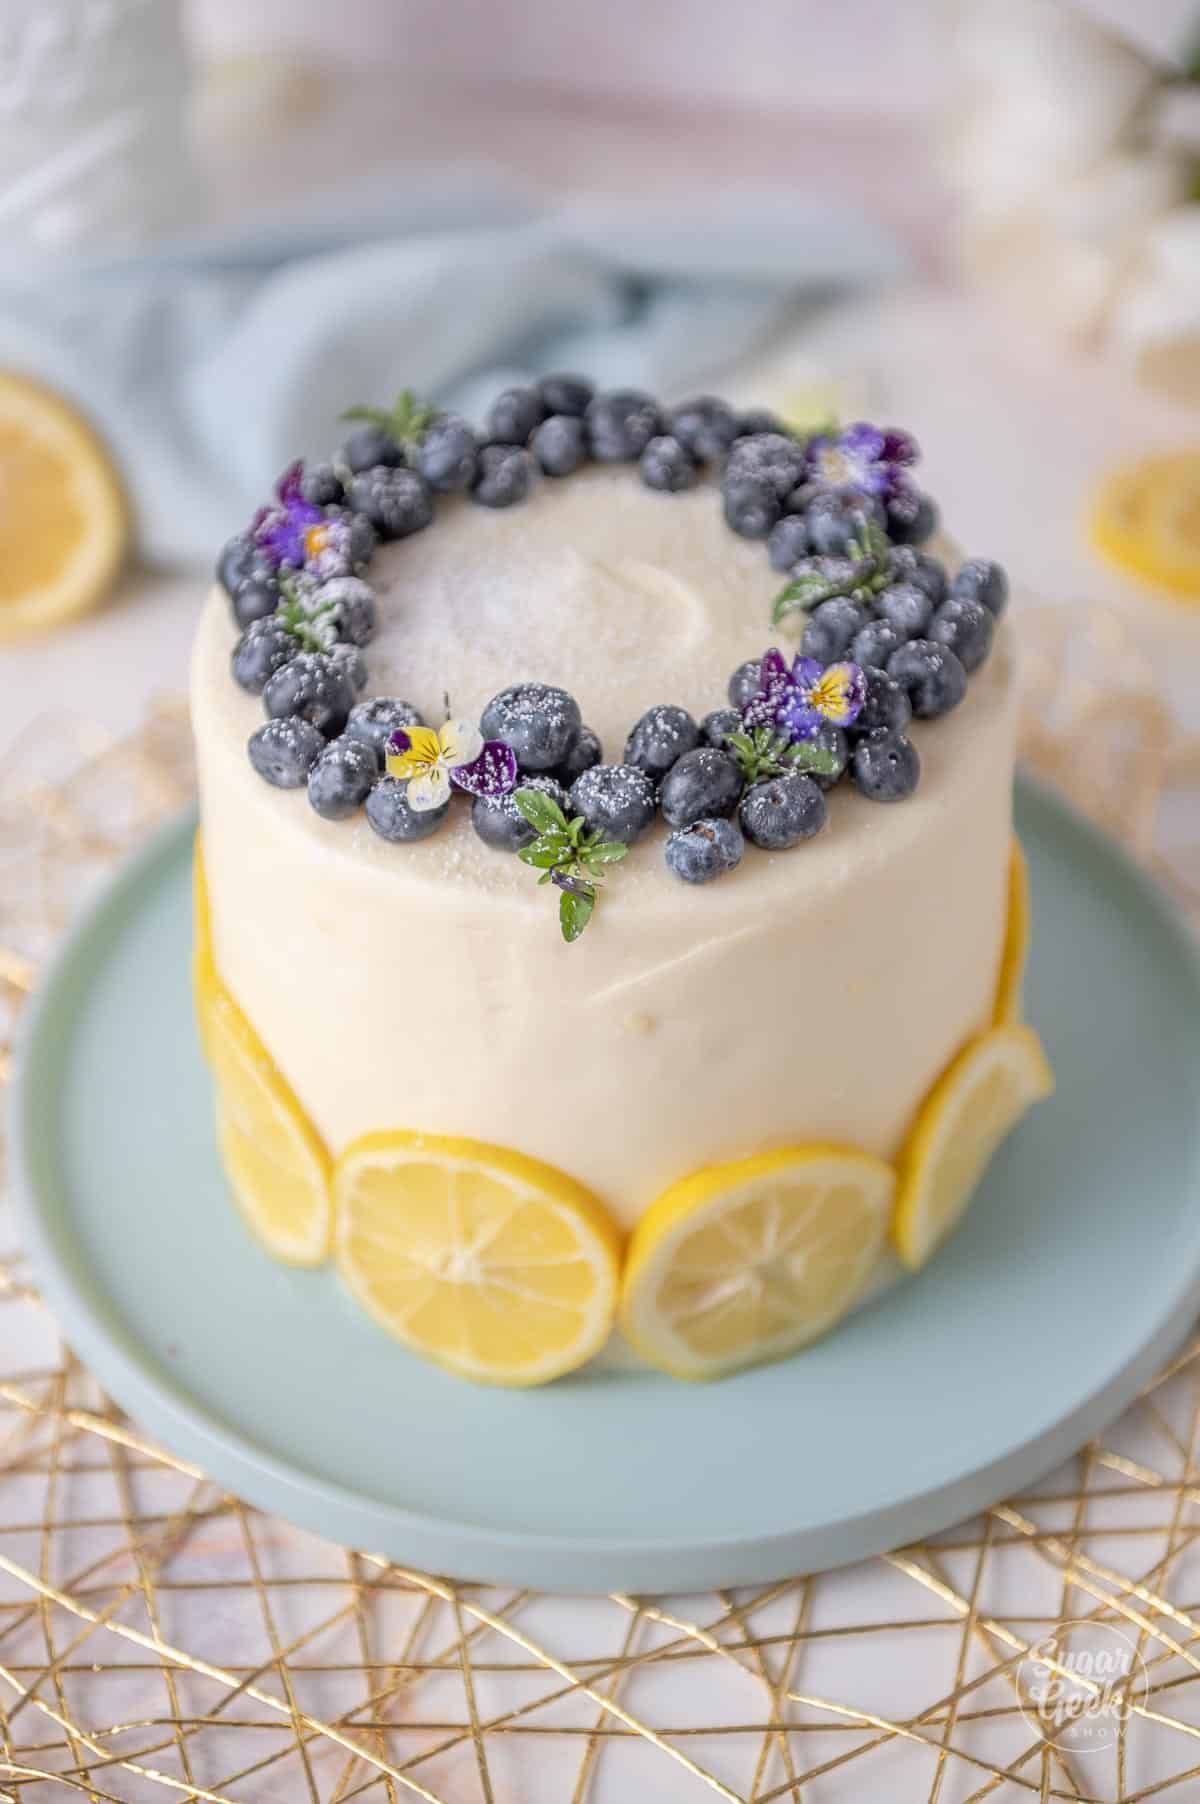
This light and fluffy lemon blueberry cake is bursting with fresh blueberries and bright lemon flavor. Perfect for spring and summer occasions, or any time you want a refreshing dessert!
Ingredients:
- 2 1/2 cups all-purpose flour
- 1 1/2 teaspoons baking powder
- 1 cup unsalted butter, softened
- 1 1/2 cups granulated sugar
- 2 teaspoons vanilla extract
- 2 tablespoons lemon juice
- 1 1/2 cups fresh blueberries (plus extra for topping)
- 1 tablespoon all-purpose flour (for tossing blueberries)
Instructions:
- Preheat the Oven: Preheat your oven to 350°F (175°C). Grease and flour two 9-inch round cake pans.
- Mix Dry Ingredients: In a medium bowl, whisk together the flour, baking powder, baking soda, and salt. Set aside.
- Cream the Butter and Sugar: In a large bowl, beat the softened butter and granulated sugar together until light and fluffy (about 3-4 minutes).
- Add the Eggs, Vanilla, and Lemon: Beat in the eggs, one at a time, mixing well after each addition. Stir in the vanilla extract, lemon zest, and lemon juice.
- Alternate Adding Dry Ingredients and Buttermilk: Gradually add the dry ingredients in three parts, alternating with the buttermilk in two parts. Start and end with the dry ingredients. Mix until just combined.
- Toss the Blueberries: In a small bowl, toss the blueberries with 1 tablespoon of flour to coat. This helps prevent them from sinking to the bottom of the cake during baking. Gently fold the blueberries into the batter.
- Bake the Cake: Divide the batter evenly between the prepared pans. Bake for 25-30 minutes, or until a toothpick inserted into the center comes out clean (with a few crumbs).
- Cool the Cake: Let the cakes cool in the pans for 10 minutes before transferring to a wire rack to cool completely.
- Frost and Serve: Once completely cool, frost with your favorite frosting (cream cheese frosting works wonderfully!) or serve plain with extra fresh blueberries on top.
Make-Ahead & Storage Instructions:
Store leftover cake in an airtight container at room temperature for up to 3 days. You can also freeze the cake for up to 3 months—just wrap it tightly in plastic wrap and foil.
Customization Ideas:
- Berry Medley: Replace blueberries with a mix of strawberries, raspberries, and blackberries for a berry-packed version.
- Lemon Glaze: For extra lemon flavor, drizzle a lemon glaze over the cake instead of frosting.
- Coconut Version: Add 1/2 cup of shredded coconut to the batter for a tropical twist.
This lemon blueberry cake is bright, refreshing, and perfect for any occasion! 🍋🫐
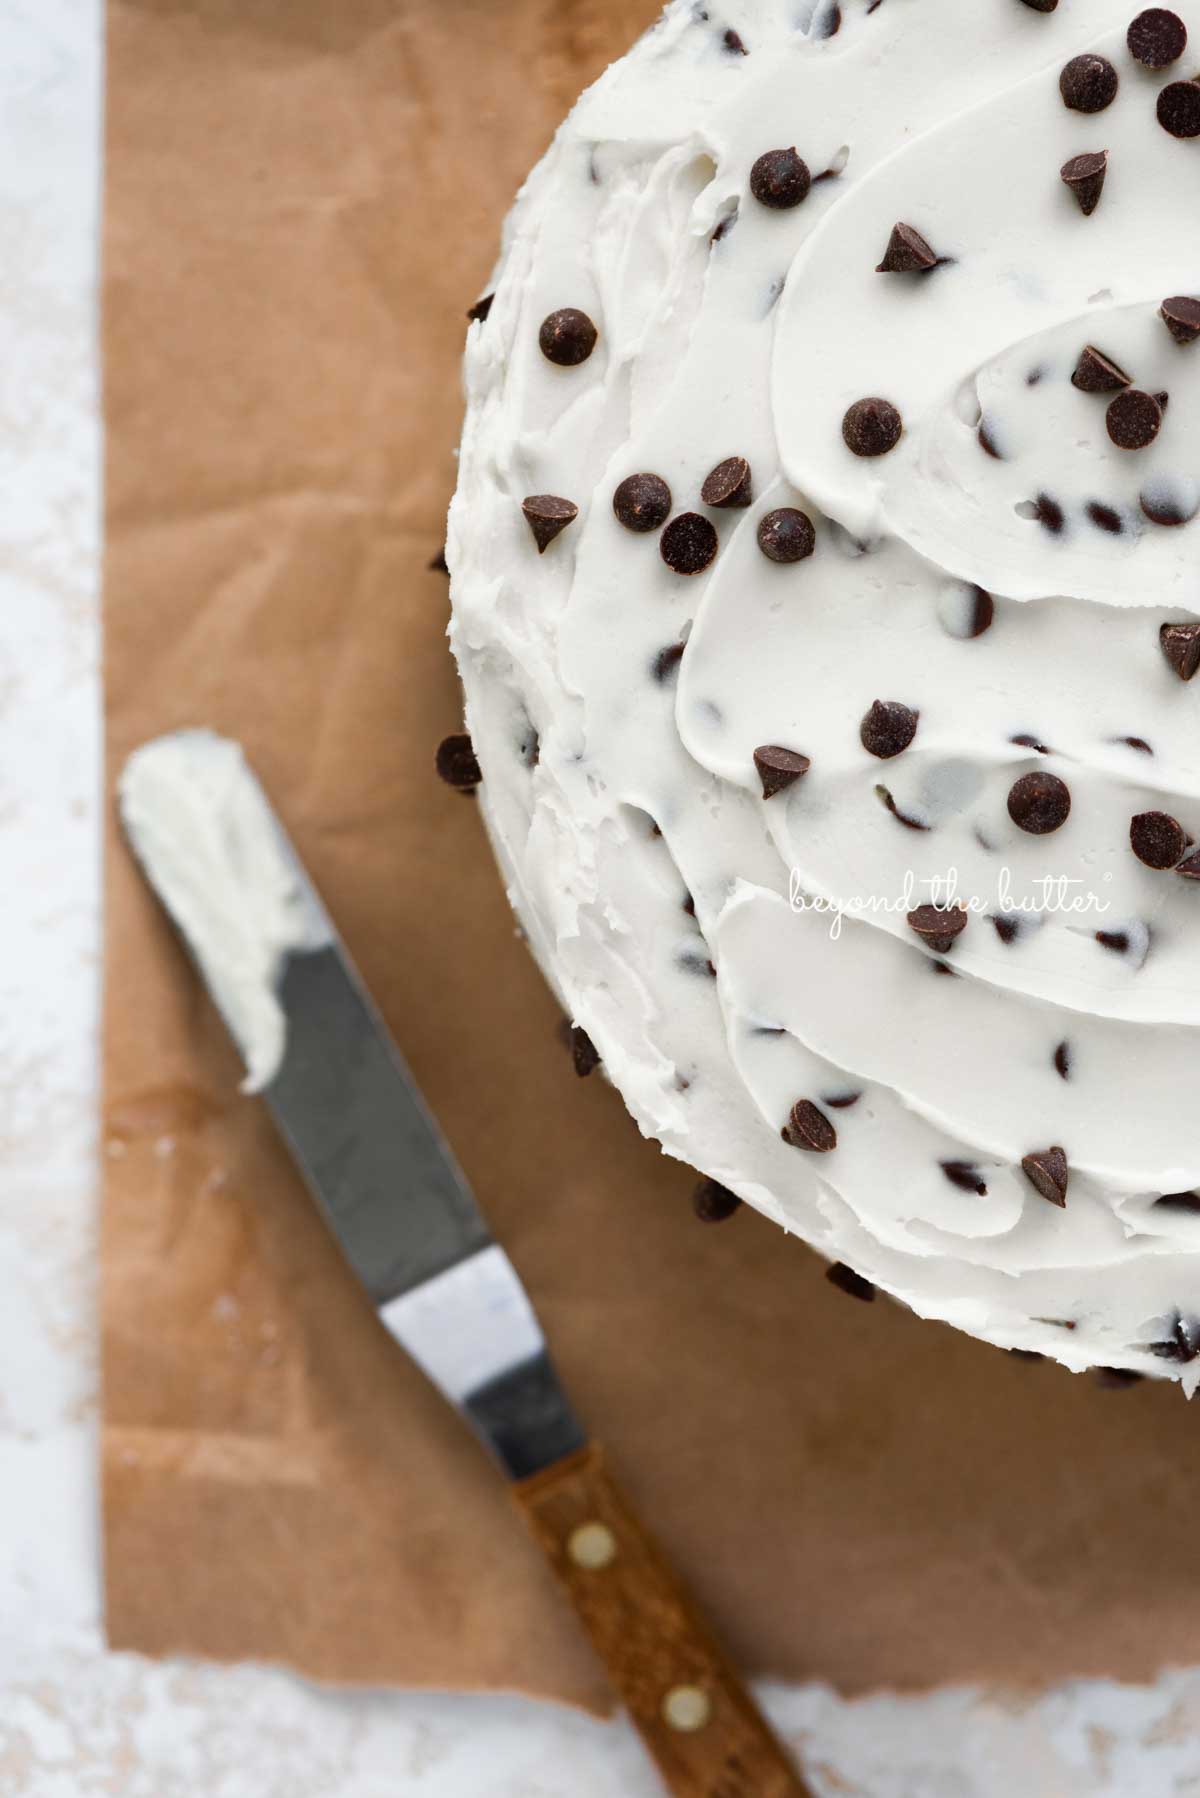
This chocolate chip cake is rich, moist, and filled with melty chocolate chips, making it the perfect dessert for chocolate lovers!
Ingredients:
- 2 1/2 cups all-purpose flour
- 1 1/2 teaspoons baking powder
- 1/2 teaspoon baking soda
- 1/2 teaspoon salt
- 1 cup unsalted butter, softened
- 1 1/4 cups brown sugar, packed
- 1/2 cup granulated sugar
- 3 large eggs
- 2 teaspoons vanilla extract
- 1 cup sour cream (or Greek yogurt)
- 1 1/2 cups semi-sweet chocolate chips
Instructions:
- Preheat the Oven: Preheat your oven to 350°F (175°C). Grease and flour a 9-inch round or square cake pan.
- Mix Dry Ingredients: In a medium bowl, whisk together the flour, baking powder, baking soda, and salt. Set aside.
- Cream the Butter and Sugars: In a large bowl, beat the softened butter, brown sugar, and granulated sugar together until creamy and light.
- Add the Eggs and Vanilla: Beat in the eggs, one at a time, mixing well after each addition. Stir in the vanilla extract.
- Alternate Adding Dry Ingredients and Sour Cream: Gradually add the dry ingredients in three parts, alternating with the sour cream in two parts. Start and end with the dry ingredients. Mix until just combined.
- Fold in the Chocolate Chips: Gently fold the chocolate chips into the batter.
- Bake the Cake: Pour the batter into the prepared pan. Bake for 30-35 minutes or until a toothpick inserted into the center comes out clean (with just a few crumbs from the chocolate chips).
- Cool the Cake: Let the cake cool in the pan for 10 minutes before transferring to a wire rack to cool completely.
- Frost and Serve: Frost with your favorite frosting or serve as is for a simple, delicious treat!
Make-Ahead & Storage Instructions:
Store leftover cake in an airtight container at room temperature for up to 3 days. It can also be frozen for up to 3 months—just wrap it well in plastic wrap and foil.
Customization Ideas:
- Nutty Version: Add 1/2 cup of chopped walnuts or pecans to the batter for added crunch.
- Double Chocolate Version: Use chocolate chips in both the batter and frosting for extra chocolate flavor.
- Frosting Options: Try pairing this cake with chocolate ganache, vanilla buttercream, or cream cheese frosting for added indulgence.
This chocolate chip cake is perfect for any occasion and will definitely satisfy your sweet tooth! 🍫🍰
This classic vanilla cake is a simple, fluffy, and delicious dessert that everyone will love. Perfect for birthdays, celebrations, or just a sweet treat with your favorite frosting!
Ingredients:
- 2 1/2 cups all-purpose flour
- 2 1/2 teaspoons baking powder
- 1/2 teaspoon salt
- 1 cup unsalted butter, softened
- 2 cups granulated sugar
- 4 large eggs, at room temperature
- 1 tablespoon vanilla extract
- 1 cup whole milk (or buttermilk for extra richness)
Instructions:
- Preheat the Oven: Preheat your oven to 350°F (175°C). Grease and flour two 9-inch round cake pans.
- Mix the Dry Ingredients: In a medium bowl, whisk together the flour, baking powder, and salt. Set aside.
- Cream the Butter and Sugar: In a large bowl, beat the butter and sugar together using an electric mixer until light and fluffy (about 3-4 minutes).
- Add the Eggs and Vanilla: Add the eggs one at a time, beating well after each addition. Stir in the vanilla extract.
- Alternate Adding Dry Ingredients and Milk: Gradually add the dry ingredients in three parts, alternating with the milk in two parts. Start and end with the dry ingredients. Mix until just combined.
- Bake the Cake: Divide the batter evenly between the prepared pans. Bake for 25-30 minutes or until a toothpick inserted into the center comes out clean.
- Cool the Cakes: Let the cakes cool in the pans for 10 minutes before transferring them to a wire rack to cool completely.
- Frost and Serve: Once the cakes are completely cool, frost with your favorite frosting (buttercream, cream cheese, or whipped cream) and enjoy!
Make-Ahead & Storage Instructions:
Store leftover cake in an airtight container at room temperature for up to 3 days. You can also freeze the cake layers for up to 3 months—just wrap them well in plastic wrap and foil.
Customization Ideas:
- Chocolate Version: Add 1/2 cup of cocoa powder to the dry ingredients for a chocolate cake.
- Fruit-Filled Version: Add fresh berries or fruit preserves between the layers for a fruity twist.
- Frosting Variations: Try different frostings like chocolate buttercream, lemon glaze, or cream cheese frosting for added flavor.
This vanilla cake is soft, airy, and perfect for any occasion. Customize it to fit your tastes and enjoy every slice! 🍰
These chicken fajita bowls are a fun, customizable dinner that everyone will love. Tender chicken with peppers and onions, topped with your favorite toppings, make these bowls the perfect meal!
Ingredients:
- 2 boneless, skinless chicken breasts, sliced into strips
- 2 tablespoons olive oil
- 1 teaspoon chili powder
- 1 teaspoon cumin
- 1/2 teaspoon paprika
- Salt and pepper, to taste
- 1 red bell pepper, sliced
- 1 yellow bell pepper, sliced
- 1 onion, sliced
- 1 cup cooked rice (or cauliflower rice for a low-carb option)
- 1/2 cup black beans, drained and rinsed
- 1/2 cup corn kernels (fresh, frozen, or canned)
- 1/2 cup shredded cheese
- Sour cream, guacamole, salsa, and fresh cilantro, for topping
Instructions:
-
Season the Chicken: In a bowl, toss the chicken strips with olive oil, chili powder, cumin, paprika, salt, and pepper.
-
Cook the Chicken: Heat a large skillet over medium-high heat. Add the seasoned chicken and cook for 5-6 minutes, until browned and cooked through. Remove from the pan and set aside.
-
Cook the Veggies: In the same skillet, add the sliced bell peppers and onion. Cook for 3-4 minutes, until tender and slightly charred.
-
Assemble the Bowls: In each bowl, layer the rice (or cauliflower rice), black beans, corn, and cooked chicken. Top with sautéed peppers and onions, cheese, and your favorite toppings like sour cream, guacamole, salsa, and cilantro.
Make-Ahead & Storage Instructions:
- Store leftovers in the fridge for up to 3 days. Reheat in the microwave or on the stovetop.
Customization Ideas:
- Vegetarian Version: Skip the chicken and add extra beans or tofu.
- Spicy Version: Add jalapeños or hot sauce for extra heat.
- Low-Carb Version: Serve over lettuce instead of rice.
These chicken fajita bowls are colorful, customizable, and perfect for a busy dinner! 🌮🥑
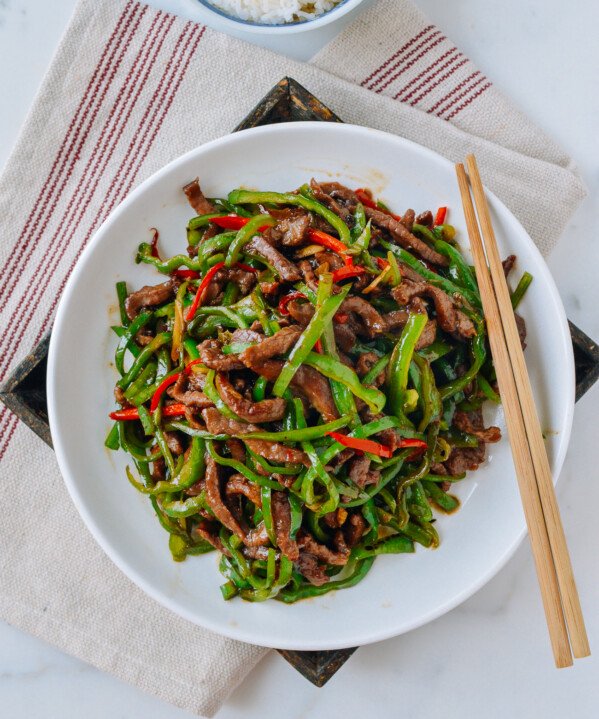
This beef and vegetable stir-fry is a colorful, quick, and healthy dinner option. Packed with protein, fiber, and flavor, it’s perfect for busy weeknights.
Ingredients:
- 1 lb beef (flank steak or sirloin), thinly sliced against the grain
- 2 tablespoons soy sauce
- 1 tablespoon cornstarch
- 1 tablespoon vegetable oil
- 1 bell pepper, sliced
- 1 onion, sliced
- 1 carrot, julienned
- 1 cup broccoli florets
- 3 cloves garlic, minced
- 2 tablespoons hoisin sauce
- 1 tablespoon soy sauce
- 1 tablespoon rice vinegar
- 1 tablespoon sesame oil
- Cooked rice, for serving
- Sesame seeds, for garnish (optional)
Instructions:
-
Marinate the Beef: In a bowl, toss the sliced beef with 2 tablespoons soy sauce and cornstarch. Let it marinate for 10-15 minutes.
-
Cook the Veggies: Heat vegetable oil in a large skillet or wok over medium-high heat. Add the bell pepper, onion, carrot, and broccoli. Stir-fry for 3-4 minutes, until tender-crisp. Remove the veggies from the pan and set aside.
-
Cook the Beef: In the same skillet, add the marinated beef and stir-fry for 2-3 minutes, until browned and cooked through.
-
Make the Sauce: Add minced garlic to the beef and cook for 30 seconds. Then, stir in hoisin sauce, soy sauce, rice vinegar, and sesame oil. Let the sauce cook for 1-2 minutes until it thickens slightly.
-
Combine & Serve: Return the cooked vegetables to the pan and toss to combine. Serve over rice and garnish with sesame seeds.
Make-Ahead & Storage Instructions:
- Store leftovers in the fridge for up to 2 days. Reheat in a skillet over medium heat.
Customization Ideas:
- Add More Veggies: Add mushrooms, zucchini, or snap peas for extra crunch and flavor.
- Spicy Version: Add chili paste or sriracha to the sauce for some heat.
- Gluten-Free: Use tamari instead of soy sauce for a gluten-free option.
This beef and vegetable stir-fry is packed with flavor and ready in no time! 🥩🥕
This creamy Tuscan garlic chicken is a rich and flavorful dish featuring tender chicken breasts in a creamy garlic sauce with spinach and sun-dried tomatoes. It’s quick to make and perfect for a weeknight dinner!
Ingredients:
- 4 boneless, skinless chicken breasts
- 2 tablespoons olive oil
- 4 cloves garlic, minced
- 1/2 cup sun-dried tomatoes, chopped
- 1 cup heavy cream
- 1/2 cup chicken broth
- 1/2 cup grated Parmesan cheese
- 2 cups fresh spinach
- 1 teaspoon dried oregano
- Salt and pepper, to taste
- Fresh parsley, for garnish (optional)
Instructions:
-
Cook the Chicken: Heat olive oil in a large skillet over medium-high heat. Season the chicken breasts with salt and pepper. Cook the chicken for 5-6 minutes on each side, until golden and cooked through. Remove from the pan and set aside.
-
Make the Sauce: In the same skillet, add garlic and cook for 1 minute, until fragrant. Add sun-dried tomatoes, chicken broth, and heavy cream. Stir to combine.
-
Add the Spinach and Parmesan: Bring the mixture to a simmer. Add spinach and cook until wilted, then stir in Parmesan cheese. Let the sauce simmer for 3-5 minutes, until thickened.
-
Combine & Serve: Return the chicken to the skillet and spoon the sauce over the top. Cook for another 2-3 minutes, until heated through. Garnish with fresh parsley and serve.
Make-Ahead & Storage Instructions:
- Store leftovers in the fridge for up to 3 days. Reheat in the skillet over low heat.
Customization Ideas:
- Add Veggies: Add mushrooms or zucchini to the sauce for extra flavor.
- Spicy Version: Add a pinch of red pepper flakes for a spicy kick.
- Low-Carb Version: Serve with cauliflower rice or zucchini noodles instead of regular pasta.
This creamy Tuscan garlic chicken is indulgent yet easy to prepare—perfect for any night! 🍗🌿
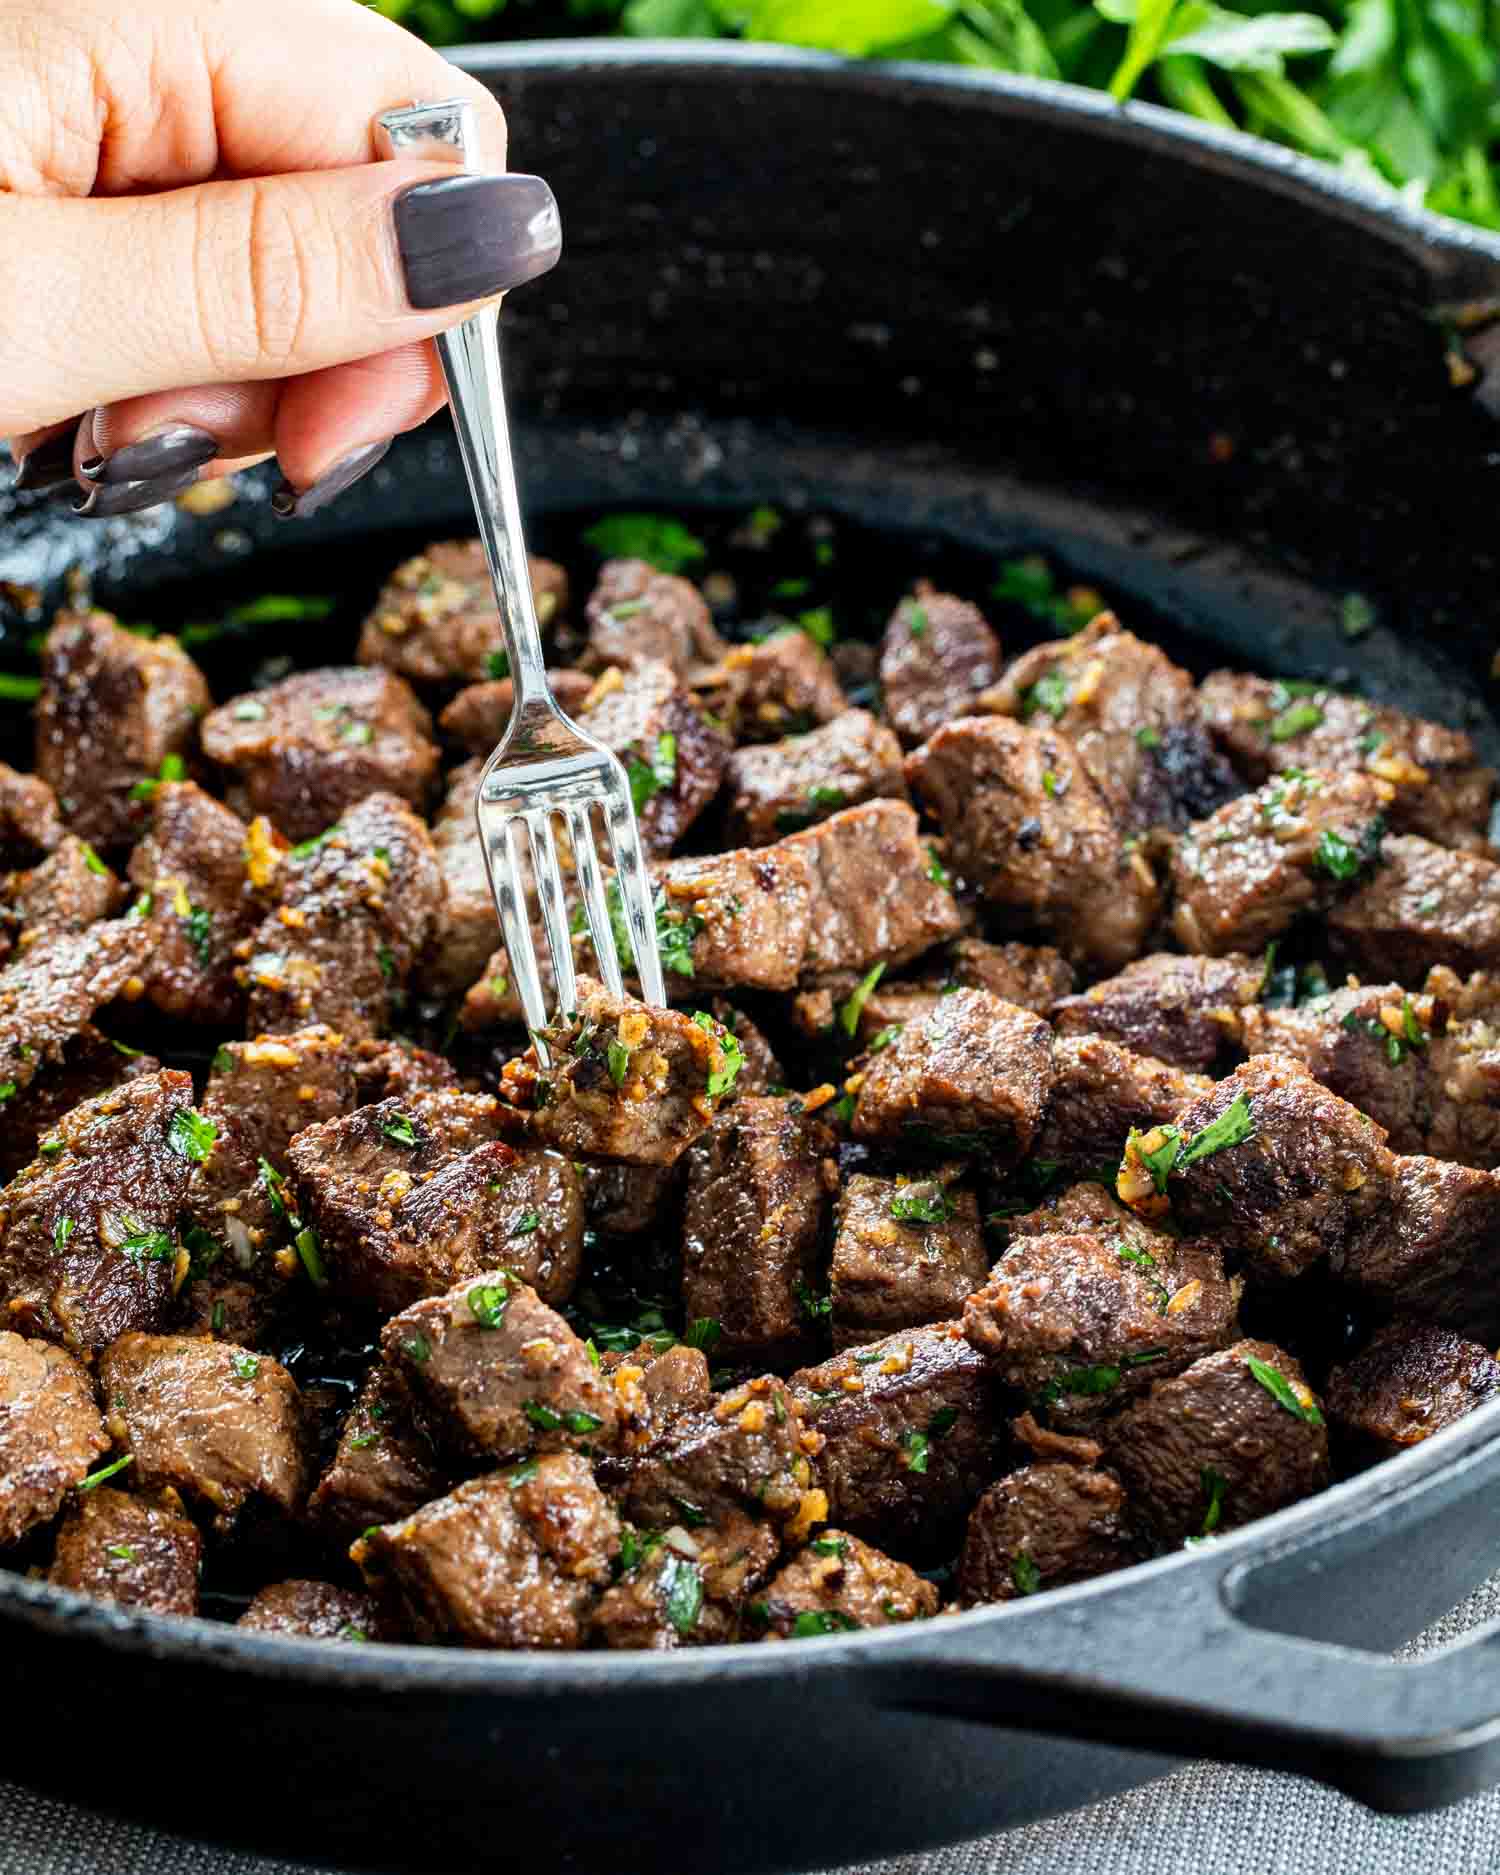
Tender steak bites cooked in a flavorful garlic butter sauce, paired with roasted asparagus, make this a quick and flavorful dinner that's both satisfying and simple to prepare!
Ingredients:
- 1 lb sirloin or ribeye steak, cut into bite-sized pieces
- 2 tablespoons olive oil
- 3 tablespoons butter
- 4 cloves garlic, minced
- 1 teaspoon dried thyme
- Salt and pepper, to taste
- 1 bunch asparagus, trimmed and cut into 2-inch pieces
- Fresh parsley, for garnish (optional)
Instructions:
-
Cook the Steak: Heat 1 tablespoon of olive oil in a large skillet over medium-high heat. Season the steak bites with salt and pepper, then add them to the skillet. Cook for 3-4 minutes on each side, until browned and cooked to your desired level of doneness. Remove the steak from the skillet and set aside.
-
Roast the Asparagus: Preheat the oven to 400°F (200°C). Place the asparagus on a baking sheet and toss with 1 tablespoon of olive oil, salt, and pepper. Roast in the oven for 12-15 minutes, or until tender.
-
Make the Garlic Butter Sauce: In the same skillet, melt butter over medium heat. Add the minced garlic and dried thyme, and cook for 1-2 minutes, until fragrant.
-
Combine & Serve: Add the cooked steak back into the skillet and toss to coat in the garlic butter sauce. Serve the steak bites with roasted asparagus on the side. Garnish with fresh parsley if desired.
Make-Ahead & Storage Instructions:
- Store leftovers in the fridge for up to 2 days. Reheat in the skillet over low heat.
Customization Ideas:
- Add Veggies: Serve with roasted sweet potatoes or sautéed spinach for more veggies.
- Spicy Version: Add a pinch of red pepper flakes to the garlic butter for some heat.
- Add a Sauce: Serve with a side of steak sauce or creamy horseradish sauce.
These garlic butter steak bites with asparagus are a quick, flavorful, and satisfying dinner option! 🥩🧄
A healthier, baked version of the classic Chicken Parmesan! Crispy chicken, marinara sauce, and melted cheese make this a family favorite that’s easy to make and delicious.
Ingredients:
- 4 boneless, skinless chicken breasts
- 1 cup breadcrumbs (use whole wheat for a healthier option)
- 1/2 cup grated Parmesan cheese
- 1 teaspoon garlic powder
- 1 teaspoon dried oregano
- Salt and pepper, to taste
- 1 egg, beaten
- 1 cup marinara sauce
- 1 cup shredded mozzarella cheese
- Fresh basil or parsley, for garnish
Instructions:
-
Preheat the Oven: Preheat your oven to 400°F (200°C). Line a baking sheet with parchment paper.
-
Prepare the Chicken: In a shallow bowl, combine breadcrumbs, Parmesan cheese, garlic powder, oregano, salt, and pepper. Dip each chicken breast into the beaten egg, then coat with the breadcrumb mixture, pressing lightly to adhere.
-
Bake the Chicken: Place the coated chicken breasts on the prepared baking sheet. Bake for 20-25 minutes, or until the chicken is cooked through and the coating is crispy.
-
Top with Sauce and Cheese: Remove the chicken from the oven. Spoon marinara sauce over each piece of chicken and top with shredded mozzarella. Return to the oven for another 5 minutes, until the cheese is melted and bubbly.
-
Serve & Enjoy: Garnish with fresh basil or parsley and serve with pasta, rice, or a side salad.
Make-Ahead & Storage Instructions:
- Leftover chicken Parmesan can be stored in the fridge for up to 3 days. Reheat in the oven or microwave.
Customization Ideas:
- Gluten-Free Version: Use gluten-free breadcrumbs for a gluten-free option.
- Extra Veggies: Add spinach or mushrooms to the marinara sauce for added veggies.
- Spicy Version: Add red pepper flakes to the marinara sauce for a bit of heat.
This baked chicken Parmesan is a healthier take on the classic, and it's absolutely delicious! 🍝🍗
These vegetarian stuffed bell peppers are a healthy and hearty dinner, filled with quinoa, black beans, and plenty of spices. They're easy to make and customizable with your favorite fillings!
Ingredients:
- 4 large bell peppers (any color), tops cut off and seeds removed
- 1 cup cooked quinoa
- 1 can (15 oz) black beans, drained and rinsed
- 1 cup corn kernels (fresh, frozen, or canned)
- 1/2 cup diced tomatoes
- 1 teaspoon chili powder
- 1/2 teaspoon cumin
- 1/2 teaspoon smoked paprika
- Salt and pepper, to taste
- 1 cup shredded cheese (cheddar or Monterey Jack)
- Fresh cilantro, for garnish (optional)
Instructions:
-
Preheat the Oven: Preheat your oven to 375°F (190°C).
-
Prepare the Filling: In a large bowl, combine the cooked quinoa, black beans, corn, diced tomatoes, chili powder, cumin, smoked paprika, salt, and pepper.
-
Stuff the Peppers: Fill each bell pepper with the quinoa mixture, pressing down lightly to pack the filling.
-
Bake the Peppers: Place the stuffed peppers in a baking dish and cover with foil. Bake for 25-30 minutes, until the peppers are tender.
-
Add Cheese: Remove the foil, sprinkle cheese over the top of each stuffed pepper, and return to the oven for an additional 5-7 minutes, until the cheese is melted and bubbly.
-
Serve & Enjoy: Garnish with fresh cilantro and serve hot.
Make-Ahead & Storage Instructions:
- These stuffed peppers can be stored in the fridge for up to 3 days. Reheat in the microwave or oven.
Customization Ideas:
- Add Meat: Add ground turkey or beef to the filling for a non-vegetarian version.
- Spicy Version: Add diced jalapeños or a sprinkle of chili flakes for heat.
- Toppings: Top with avocado, sour cream, or salsa for extra flavor.
These vegetarian stuffed bell peppers are filling, nutritious, and perfect for a satisfying dinner! 🌶️🌱